
A seamless texture is an image that can repeat in every direction without making the tile boundary obvious. When it works, one square image can cover a floor, wall, terrain patch, textile surface, product package, or web background and still feel like one continuous material.
The important detail is this: a texture can look good as a single image and still fail the moment you repeat it. That is why a practical seamless texture workflow is less about making one pretty square and more about checking how that square behaves as a pattern.
Start with the final use
Before writing a prompt or uploading a source image, decide where the texture will live.
| Use case | What matters most |
|---|---|
| Game floors and walls | Clear repeat, readable scale, no distracting landmarks |
| Blender materials | Natural surface detail, neutral lighting, flexible scale |
| Wallpaper patterns | Strong rhythm, clean motif spacing, no broken edges |
| Fabric and textile ideas | Fiber direction, weave density, print repeat |
| Product mockups | Surface character without stealing attention |
A stone floor texture and a wallpaper pattern are both seamless textures, but they need different decisions. Stone can tolerate organic variation. Wallpaper needs more deliberate spacing. Fabric needs visible structure without harsh lighting.
Choose your starting method
There are two useful ways to make a seamless texture:
- Generate a new texture from a prompt.
- Convert an existing image into a seamless tile.
Prompt generation is best when you want to explore ideas quickly: mossy stone, woven linen, terrazzo, marble veins, pixel dungeon floors, or abstract background patterns.
Image conversion is best when you already have useful source material: a fabric scan, plaster wall photo, AI render, paper grain, concrete surface, or pattern reference.
If the goal is exploration, start with the Seamless Texture Generator. If the goal is cleaning up an image you already like, start with the Image to Seamless Texture Converter.
Write texture-first prompts
Generic image prompts often create illustrations, product photos, or scenic surfaces. A texture prompt should ask for a flat material asset.
Use this structure:
material + surface details + scale + lighting + style + repeat instruction
Example:
weathered limestone floor tile, subtle chipped edges, realistic mineral grain, neutral studio lighting, top-down view, evenly distributed detail, square seamless repeat
Helpful phrases:
- top-down view
- flat lighting
- evenly distributed detail
- no border
- no perspective
- square seamless repeat
- tileable material texture
Avoid asking for dramatic shadows, camera angles, centered objects, logos, text, or anything that creates a single focal point. Focal points make repeats easier to notice.
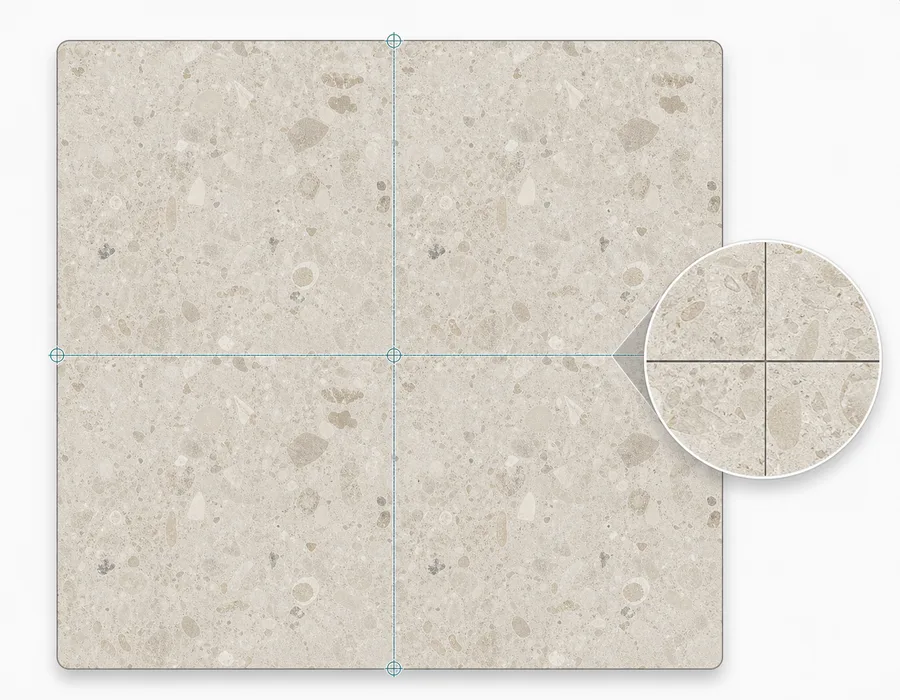
Inspect the repeat, not just the image
The fastest test is a 2x2 repeat preview. This places four copies of the texture together so the original borders meet in the center.
Look for:
- A cross-shaped seam where the four tiles meet.
- A lighting shift from one side to another.
- A scratch, crack, fiber, or motif that stops at the edge.
- A repeated object that appears too regularly.
- A corner that becomes obvious when tiled.
If your eye immediately lands on the tile boundary, the texture is not ready yet.
Fix or regenerate based on the problem
Not every seam problem needs the same fix.
| Problem | Better next step |
|---|---|
| Uneven lighting | Use flatter source lighting or regenerate with "neutral flat lighting" |
| Hard border line | Convert or repair with image-to-seamless processing |
| Too much perspective | Regenerate with "top-down view, no perspective" |
| One object repeats obviously | Use more evenly distributed detail |
| Pattern spacing feels broken | Adjust the prompt for motif scale and density |
For prompt-based work, it is often faster to improve the prompt than to repair a bad output. For uploaded images, the source image quality matters most.
Export for the stage you are in
You do not always need the largest texture first.
Use a smaller export for early direction tests. It is fast to download, fast to place into Blender or a mockup, and easy to compare. Move to larger exports once the repeat, scale, and material direction are right.
For many workflows:
- 512px is enough for quick tests.
- 1024px is better for close previews.
- 2048px gives more room for production studies and refinement.
A simple repeat-ready workflow
- Decide the use case and material scale.
- Generate a texture or upload a source image.
- Check the result in a 2x2 repeat preview.
- Fix seams, lighting, and obvious repeated landmarks.
- Export the PNG and test it in the destination tool.
The repeat check is the step that saves the most time. It turns texture creation from guesswork into a visible quality-control pass.
Try it on your next texture
Open the Seamless Texture Generator, describe a material, switch to the tiled preview, and inspect the center seams before downloading. If you already have an image, use the Image to Seamless Texture Converter and compare the repaired tile as a repeat.