
Stone floor textures are one of the easiest materials to generate and one of the easiest to get wrong. A single preview can look convincing, but once the texture repeats across a floor, small problems become obvious: a bright stone appears every few tiles, a crack creates a visible line, or the lighting turns the whole surface into a grid.
This case study walks through a simple stone floor workflow: prompt, repeat check, adjustment, and export.
The goal
The target texture is a square stone floor tile that can work in a game prototype, Blender scene, or interior material board.
If you are planning a similar surface, compare the stone texture generator, concrete texture generator, game texture workflow, and Blender texture workflow before choosing prompt details.
The texture needs to be:
- top-down, with no camera perspective
- evenly distributed, without one obvious hero stone
- neutral in lighting, so repeated tiles do not create blocks
- detailed enough to read as stone at medium distance
- clean enough to survive a 2x2 repeat preview
For a first pass, the texture does not need full PBR maps. The goal is a good base color texture that can be tested quickly.
First prompt
The first prompt should describe the material as an asset, not a scene.
weathered limestone floor texture, irregular stone slabs, subtle chipped edges, beige and gray mineral grain, top-down view, flat neutral lighting, evenly distributed detail, square seamless repeat
This prompt includes the details that matter most:
| Prompt detail | Why it matters |
|---|---|
| weathered limestone floor texture | Sets the material and use case |
| irregular stone slabs | Adds floor structure |
| subtle chipped edges | Gives age without making the pattern too busy |
| beige and gray mineral grain | Controls palette |
| top-down view | Avoids perspective |
| flat neutral lighting | Reduces repeat blocks |
| square seamless repeat | Pushes the output toward tileability |
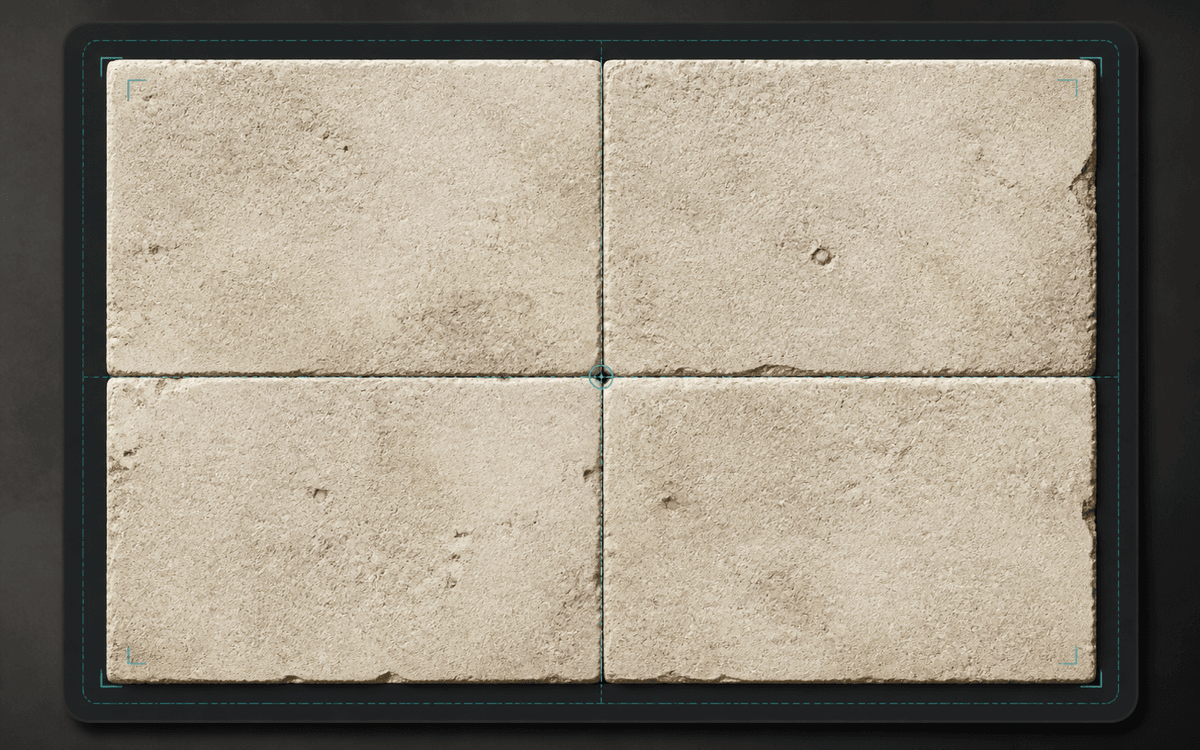
Inspecting the first result
After generating the texture, the single image preview is only the first check. The real test is the 2x2 repeat preview.
In the repeat view, look at the center cross where the tile edges meet. For stone floors, the common problems are:
- a hard vertical or horizontal seam
- one large stone that repeats too clearly
- lighting that gets darker on one side
- cracks that stop at the border
- corners that form a visible square
If the texture fails here, it will almost always fail once applied to a large floor.
Adjusting the prompt
If the first result has a visible repeat, the fix is usually a tighter prompt.
For obvious repeated stones:
smaller irregular stone slabs, evenly distributed size variation, no single dominant stone
For lighting blocks:
flat diffuse lighting, no shadows, no directional light
For broken seams:
continuous stone pattern, no border, seamless tile edges
For too much noise:
medium detail, subtle surface wear, low contrast mineral grain
The second prompt might become:
weathered limestone floor texture, smaller irregular stone slabs, subtle chipped edges, low contrast beige and gray mineral grain, flat diffuse lighting, no shadows, top-down view, no border, continuous stone pattern, square seamless repeat
Testing scale
Once the repeat looks clean, the next question is scale.
A stone floor texture can be technically seamless but still feel wrong if the slabs are too large or too small. For a game prototype, medium-sized slabs are usually easier to read. For an architectural render, smaller mineral detail may matter more.
Test the exported texture on a simple plane before using it in a final scene. If the repeat feels too obvious from a distance, reduce contrast or regenerate with more subtle variation.
When to use image-to-seamless instead
Prompt generation is useful for exploring stone styles quickly. But if you already have a stone photo, scan, or AI render with the right character, use the Seamless Texture Generator.
Image conversion is better when:
- the material direction is already correct
- you want to preserve real stone detail
- the source only needs edge cleanup
- the prompt keeps drifting away from the desired look
Prompt generation is better when:
- you need new directions fast
- the material does not exist yet
- you want to test several styles
- the source photo has bad perspective or lighting
Final workflow
- Start with a texture-first prompt.
- Generate a square stone floor texture.
- Switch to 2x2 repeat preview.
- Tighten the prompt if one feature repeats too clearly.
- Export a PNG.
- Test the texture on a floor plane or game surface.
The important move is to check the repeat before polishing. A stone texture with a visible seam is hard to hide later.
Try the same workflow
Open the Seamless Texture Generator and start with a stone floor prompt. If you want the deeper process behind repeat checking, read the How to Make Seamless Textures guide, then compare focused material pages such as stone textures, concrete textures, and fabric textures.